
Gluten-Free Bread: Easy Homemade Vegan Yeast Bread
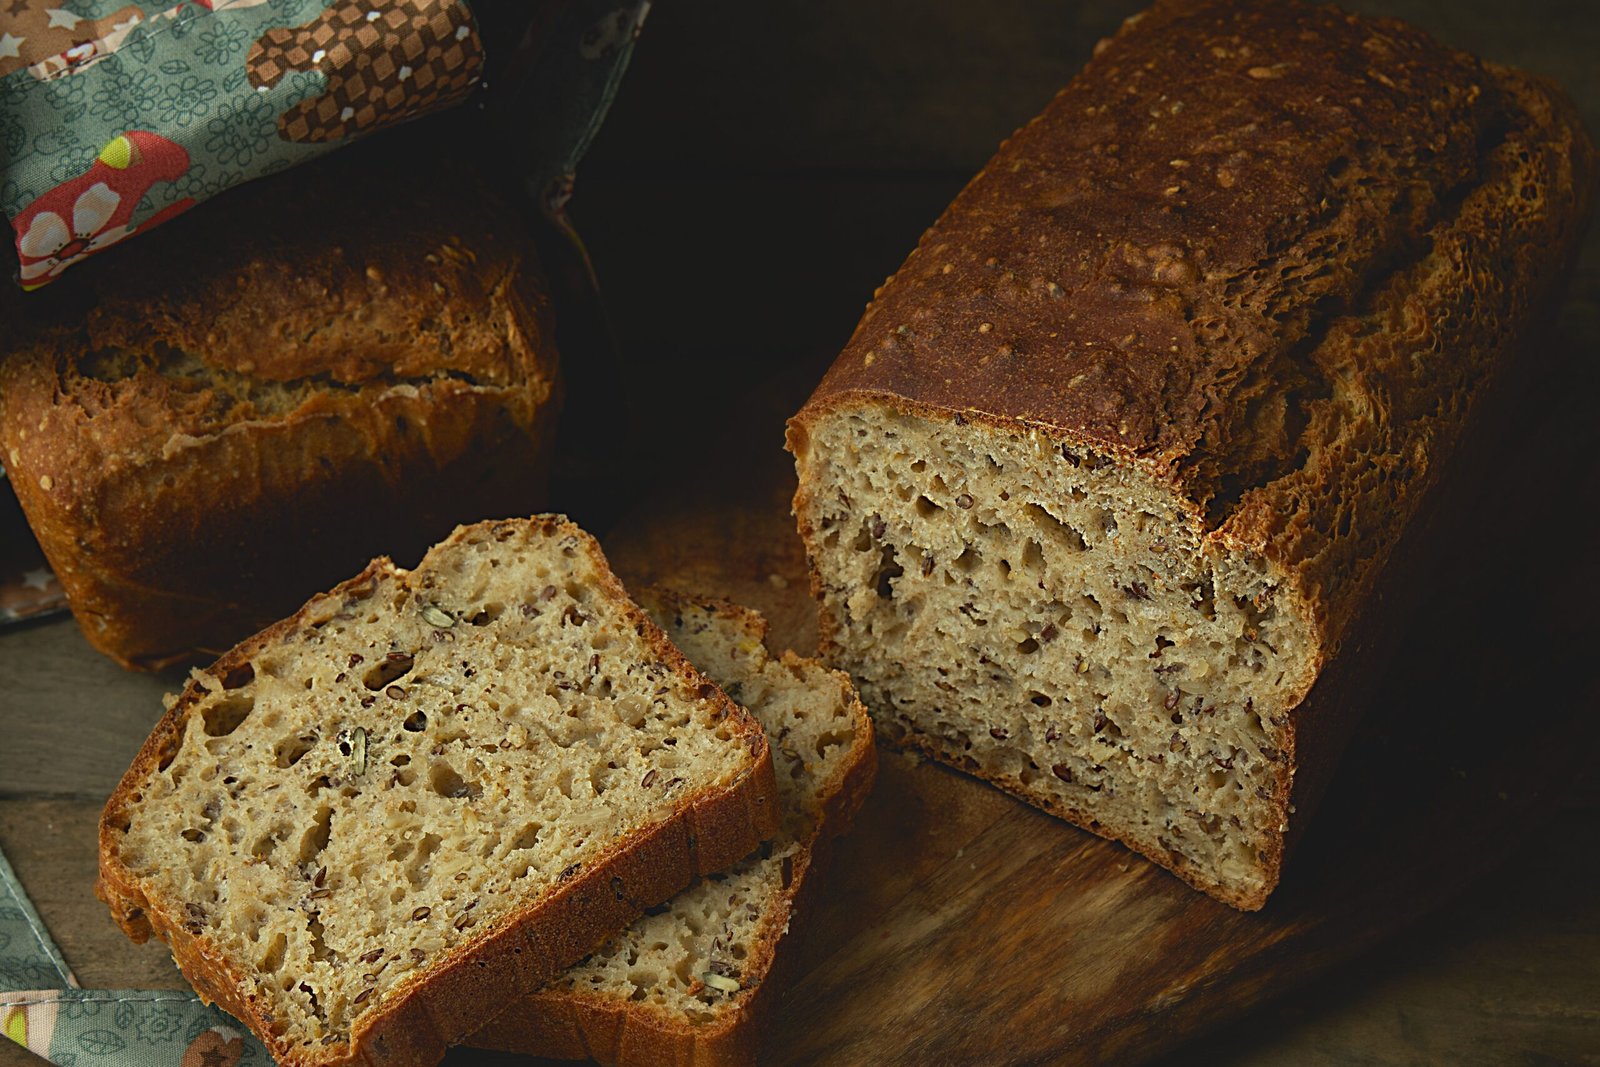
Making gluten-free bread at home can feel confusing at first, especially if you are used to traditional wheat dough. Gluten-free dough is softer, wetter, and much stickier, and trying to make it behave like regular bread dough is one of the easiest ways to end up with a dry or dense loaf.
This homemade version is completely vegan and uses yeast for a light, bread-like rise. A combination of gluten-free flour, starches, and psyllium husk provides the structure that gluten would normally create.
You will learn not only how to make the bread, but also what the dough should look like, how to proof it correctly, how to recognize when the loaf is baked through, and how to troubleshoot common problems such as gummy centers, dry crumbs, and poor rising.
Gluten-free bread is bread made without wheat, rye, barley, or other gluten-containing ingredients. Instead of relying on gluten for structure, it uses gluten-free flours, starches, and binders to hold the loaf together.
In traditional wheat bread, gluten forms an elastic network that traps the gas produced by yeast. That network helps the dough stretch, rise, and maintain its shape.
A gluten-free loaf lacks that natural gluten network. It needs a different combination of ingredients to create structure.
That usually means using:
- gluten-free flour;
- one or more starches;
- enough liquid for proper hydration;
- a binder such as psyllium husk;
- yeast or another leavening method.
Once you understand that difference, gf bread becomes much easier to work with. The goal is not to make gluten-free dough feel like wheat dough. The goal is to give the softer dough enough moisture and structure to rise and bake properly.
If you need to avoid gluten strictly, always check the labels on packaged ingredients. Flour blends, oats, yeast products, and other ingredients can sometimes be processed in facilities that also handle gluten-containing products.
What Makes Gluten-Free Bread Different?
The biggest surprise for many first-time gluten-free bakers is the dough itself.
Gluten-free bread dough is usually much wetter and softer than traditional bread dough. Depending on the flour blend and binder, it can look anywhere from a thick batter to a very sticky dough.
Here’s what matters most: do not automatically add more flour because the mixture looks sticky.
A few differences are especially important.
The Dough Is Wetter
Gluten-free flours and binders need enough water to hydrate properly. If you reduce the liquid until the dough feels like regular wheat dough, your finished bread may become dry, dense, or crumbly.
Traditional Kneading Is Not Necessary
Kneading wheat dough develops gluten. No gluten network needs developing here, so the usual stretch-and-fold or long kneading process is unnecessary.
Thorough mixing is still important because the flour, starch, yeast, salt, psyllium, and moisture need to be evenly distributed.
Binders Provide Structure
Psyllium husk helps hold water and gives the dough more stability. It also helps the baked bread stay flexible enough to slice rather than breaking apart immediately.
Hydration Has a Major Effect on Texture
Too little liquid can create dry, dense bread. Too much liquid can contribute to a gummy center or a loaf that rises and then collapses.
This is why weighing ingredients is especially helpful in gluten-free baking.
Proofing Looks Different
Do not expect every gluten-free loaf to double dramatically in size. A moderate, visible rise is usually more useful than waiting for the dough to behave exactly like wheat bread.
Cooling Is Part of the Baking Process
Cutting gluten-free bread while it is still hot can make the crumb look wetter and gummier than it actually is.
Letting the bread cool completely gives its internal structure time to settle before you slice it.
Ingredients You Need for Gluten-Free Bread
A successful loaf does not need a huge ingredient list. What matters is understanding why each ingredient is there.
Gluten-Free Flour Blend
A balanced gluten-free flour mixture makes bread much easier to manage.
For this recipe, we use brown rice flour as the main flour, combined with tapioca starch and potato starch.
Brown rice flour provides body and a mild whole-grain character, while the starches lighten the mixture and improve the texture.
Commercial gluten-free flour blends can also be useful, but they vary considerably. Some already contain xanthan gum or other binders, while others have very different grain-to-starch ratios.
That means replacing the flour mixture in a bread recipe with a random gluten-free blend may change how much liquid you need.
Starch
Starches help soften and lighten gluten-free bread.
Common options include:
- tapioca starch;
- potato starch;
- cornstarch.
They do not behave the same way.
Tapioca starch can contribute flexibility and a slightly more elastic crumb. Potato starch can help create a softer texture and retain moisture. Cornstarch is useful in some blends but can create a different crumb structure.
This recipe intentionally combines brown rice flour with tapioca and potato starch rather than relying on a single flour.
Psyllium Husk
Psyllium husk is particularly useful in gluten-free yeast bread because it absorbs water and forms a gel-like structure.
That helps the dough:
- hold moisture;
- trap some of the gas produced by yeast;
- maintain its shape;
- stay more flexible;
- slice more cleanly after baking.
This recipe uses whole psyllium husk by weight.
Psyllium husk powder is more finely ground and absorbs liquid differently, so don’t automatically substitute it using the same volume measurement. For the most consistent result, use the form specified in the recipe and weigh it.
Yeast
Yeast produces gas as the dough proofs, helping the loaf rise.
This recipe uses instant yeast, which you can mix directly with the dry ingredients.
The temperature of your liquid still matters. It should be comfortably warm, not extremely hot. Very hot water can damage the yeast.
If you are using active dry yeast instead, follow the package directions to bloom or activate it before mixing the dough.
Water
Water hydrates the flour, starches, and psyllium.
Hydration matters here because gluten-free dough needs enough liquid to stay soft while it rises and bakes.
You can use an unsweetened plant-based milk in some gluten-free bread recipes, but water keeps this version simple and avoids introducing unnecessary ingredients.
Oil
A small amount of oil helps the crumb stay softer and adds richness without dairy or butter.
A neutral vegetable oil, avocado oil, or mild olive oil works well.
Sugar
A small amount of sugar supports flavor and gives the yeast an easily available carbohydrate during the early stages of fermentation.
This is not intended to make the bread sweet.
Salt
Salt is essential for flavor. It also helps keep the dough and fermentation balanced.
Don’t leave it out just because the amount seems small.
Easy Gluten Free Bread Recipe
If you typed “gluten free bread recipe easy” into a search bar because you want a straightforward loaf without complicated techniques, this method keeps the process manageable.
Measuring by weight is the most reliable way to make this recipe.
Easy Homemade Vegan Gluten Free Yeast Bread
A soft, sliceable homemade gluten-free loaf made with brown rice flour, two starches, psyllium husk, and yeast. Mix the dough rather than knead it, then bake in a standard loaf pan.
Pan: 9 x 5-inch loaf pan
Oven: 375°F (190°C)
Ingredients
- 300 g brown rice flour, about 2 cups
- 150 g tapioca starch, about 1 1/4 cups
- 50 g potato starch, about 1/3 cup
- 20 g whole psyllium husk, preferably weighed
- 7 g instant yeast, 2 1/4 teaspoons
- 15 g granulated sugar, about 1 tablespoon
- 10 g fine salt, about 1 3/4 teaspoons
- 480 g warm water, about 2 cups
- 30 g neutral oil or mild olive oil, about 2 tablespoons
Instructions
- Prepare the pan.
Lightly oil a 9 x 5-inch loaf pan and line it with parchment paper to make the bread easier to lift out after baking. - Combine the dry ingredients.
Add the brown rice flour, tapioca starch, potato starch, whole psyllium husk, instant yeast, sugar, and salt to a large mixing bowl. Whisk thoroughly to distribute the yeast, salt, and psyllium evenly. - Add the water and oil.
Pour in the warm water and oil. - Mix thoroughly.
Stir firmly with a sturdy spoon or use a stand mixer with a paddle attachment. Continue mixing for about 3 to 4 minutes, scraping down the bowl as necessary. - Let the mixture hydrate briefly.
Allow the dough to stand for about 5 minutes. The psyllium will absorb some liquid, and the dough should thicken noticeably. - Check the consistency.
The dough should be thick, sticky, and scoopable. It should hold a soft mound but should not resemble a firm ball of wheat bread dough. Avoid adding extra flour just because it sticks to your hands or spoon. - Transfer to the pan.
Scoop the dough into the prepared loaf pan. - Smooth the top.
Use a damp spatula or damp fingertips to smooth the surface and gently shape the top into a slightly rounded loaf. - Proof the dough.
Cover loosely and place the pan in a comfortably warm location. Let the dough rise until it looks visibly lighter and about 30 to 50 percent larger. The top should appear slightly expanded and airy rather than dense. Depending on room temperature and yeast activity, this may take approximately 35 to 60 minutes. - Preheat the oven.
While the loaf is proofing, preheat the oven to 375°F (190°C). - Bake.
Bake for approximately 55 to 65 minutes. If the top is browning too quickly before the center is done, loosely cover it with foil for the last part of baking. - Check for doneness.
The loaf should have a well-browned crust and feel firm, not soft or wet along the sides. If you use an instant-read thermometer, a center temperature of about 205 to 210°F (96 to 99°C) is another good sign the loaf has baked through. - Remove from the pan.
Let the loaf stand in the pan briefly, then carefully lift it out and place it on a wire rack. - Cool completely.
Resist slicing it while it is hot. Let the loaf cool completely so the interior structure can set before cutting.
Recipe Notes
- A kitchen scale is strongly recommended for the flour, starches, and psyllium.
- This formula uses whole psyllium husk, not psyllium husk powder.
- If your dough looks softer than regular bread dough, that’s normal.
- Do not add flour until the dough becomes kneadable. That can make the loaf too dry.
- Proof based on how the dough looks, not just the clock.
- If you need strictly gluten-free ingredients, check the package labels for appropriate gluten-free manufacturing and handling information.
How to Make Gluten-Free Bread Step by Step
Understanding how to make gluten-free bread becomes easier when you know why each stage matters.
1. Prepare the Loaf Pan
Gluten-free dough can be sticky, so preparing your pan before mixing prevents unnecessary delays later.
Parchment also makes it easier to remove the loaf without damaging the sides.
2. Prepare the Yeast Correctly
You can whisk instant yeast directly into the dry ingredients.
If you use a different type of yeast, follow the manufacturer’s instructions. Active dry yeast, for example, may require a different preparation.
Whatever yeast you choose, avoid extremely hot liquid.
3. Combine the Dry Ingredients Thoroughly
This step matters more than it might seem.
Distribute psyllium, salt, and yeast evenly throughout the flour and starch mixture. If the psyllium is concentrated in one spot, it can absorb water unevenly and create dense or gel-like areas.
4. Add the Wet Ingredients
The warm water starts hydrating the flour and psyllium immediately.
The oil helps keep the finished crumb softer.
5. Mix Well
You do not need to knead this dough, but you do need to mix it thoroughly.
Keep mixing until there are no obvious pockets of dry flour and the dough looks uniform.
6. Give the Psyllium Time to Hydrate
The mixture can look surprisingly loose right after you add the water.
Wait a few minutes before deciding whether something is wrong.
As the psyllium absorbs water, the dough thickens and becomes easier to transfer.
7. Look at the Dough Before Adding Anything
The correct dough should be:
- thick;
- sticky;
- moist;
- scoopable;
- softer than wheat bread dough;
- capable of holding a gentle mound.
It should not be dry enough to knead comfortably on the counter.
8. Transfer and Smooth
Spoon the dough into your prepared loaf pan and smooth the top with a damp spatula.
Smoothing helps prevent sharp peaks from burning during baking and gives the loaf a more even shape.
9. Proof Until You See a Clear Rise
Put the pan somewhere comfortably warm.
Watch for the dough to become visibly fuller and slightly aerated. Do not insist that it double in size.
Stopping the proof at the right point gives the loaf a better chance of maintaining its structure in the oven.
10. Bake Completely
A brown crust does not automatically mean the center is finished.
Gluten-free loaves contain substantial moisture, and the center needs enough baking time to set.
11. Check the Center
Look for a firm crust and sides, good overall browning, and a loaf that feels structurally set.
An instant-read thermometer can provide another useful cue.
12. Cool Before Slicing
This step is easy to underestimate.
The crumb continues to stabilize as the loaf cools. Cutting too soon releases steam and compresses the still-soft interior.
The result can look gummy even when the recipe was mixed correctly.
What Should Gluten-Free Bread Dough Look Like?
Gluten-free bread dough should usually be thick, sticky, and much softer than traditional wheat bread dough.
It may remind you of an extremely thick batter rather than something you would knead by hand.
For this recipe, imagine a mixture that you can scoop with a spoon or spatula. It should slowly hold a mound but remain visibly moist.
When you drag a spatula through the bowl, the dough should move as one thick mixture rather than run like cake batter.
At the same time, it should not form a dry, smooth ball.
Here’s what matters most: stickiness does not automatically mean that your dough needs more flour.
That instinct comes from wheat bread baking, where you can sometimes adjust a very sticky dough with flour during kneading.
Gluten-free bread is different.
Adding flour until the dough stops sticking can remove too much hydration that gluten-free flours and psyllium need. The finished loaf may then be heavy, dry, or crumbly.
How to Make Gluten-Free Yeast Bread Rise Properly
Successful gluten-free yeast bread depends on active yeast, appropriate hydration, good dough structure, and careful proofing.
Start With Reliable Yeast
Old or improperly stored yeast may lose activity.
If you are unsure about your yeast, check its packaging, storage instructions, and expiration information before making the bread.
Keep the Liquid Warm, Not Hot
Warm water supports yeast activity.
Very hot water can damage the yeast, while very cold water may slow the fermentation considerably.
The water should feel comfortably warm, not hot.
Find a Comfortable Proofing Environment
A cold kitchen can slow the rise.
Place the loaf somewhere comfortably warm and free from strong drafts. You do not need an excessively hot environment.
Watch the Dough Instead of Only Watching the Clock
Proofing times vary with room temperature, yeast activity, and ingredients.
Look for visible expansion.
For this loaf, the dough should look about 30 to 50 percent larger, with a fuller, slightly aerated surface.
It does not need to double like a traditional wheat loaf.
Avoid Over-Proofing
Waiting too long can weaken the structure.
The dough may rise impressively and then collapse because it no longer has enough strength to support the expanded gases.
Avoid Under-Proofing
Putting the bread into the oven before the yeast has produced enough gas can create a compact, dense crumb.
Look for a clear but controlled rise.
Do You Need to Knead Gluten-Free Bread?
No. This style of gluten-free bread does not need traditional kneading.
Kneading wheat dough helps organize and strengthen gluten proteins. Since gluten-free dough lacks that gluten network, traditional kneading doesn’t accomplish the same thing.
That does not mean you should barely stir the ingredients together.
Thorough mixing still matters.
Mixing helps:
- hydrate the flour;
- distribute the yeast;
- distribute the psyllium;
- dissolve and distribute the salt and sugar;
- create a uniform dough.
Think mix thoroughly, rather than knead until elastic.
Why Psyllium Husk Helps Gluten-Free Bread
Psyllium husk helps solve one of the central challenges of gluten-free baking: creating a moist dough that still has enough structure to hold together.
When psyllium absorbs water, it thickens and becomes gel-like.
In bread dough, this can help provide:
Structure
Hydrated psyllium supports the dough so it isn’t simply a loose mixture of flour, starch, and water.
Moisture Retention
Because psyllium holds water, it helps keep more moisture within the dough while the loaf bakes.
Flexibility
A well-balanced gluten-free loaf should bend slightly rather than crumble immediately when sliced.
Psyllium helps contribute to that flexibility.
Sliceability
The added structure helps the bread hold together when you cut it for toast or sandwiches.
You do not need to think of psyllium as a perfect replacement for gluten. It is simply one useful tool for creating a more stable, workable gluten-free dough.
Common Gluten Free Bread Problems and How to Fix Them
Even experienced bakers occasionally get an unexpected gluten-free loaf. The useful question is not simply, “What went wrong?” but which part of the process is most likely responsible?
Bread Is Too Dense
Likely causes: insufficient proofing, inactive yeast, dough that was too dry, inaccurate flour measurements, or a flour blend that absorbs more liquid than expected.
What to do: Check your yeast, weigh the dry ingredients, and make sure the dough remains soft and hydrated.
During proofing, wait for visible expansion instead of baking strictly by the clock.
If you changed the flour mixture, remember that a new blend may require different hydration.
Bread Is Gummy Inside
Likely causes: underbaking, slicing while the bread is still hot, excessive liquid, measurement errors, or an unsuitable flour-to-binder balance.
What to do: Bake until the loaf is fully set through the center, not merely brown on the outside.
Then allow it to cool completely before slicing.
If the problem continues, verify the ingredient weights carefully. Small measuring differences matter more in gluten-free baking than many beginners expect.
Bread Is Dry or Crumbly
Likely causes: too little water, too much flour, inadequate binder, overbaking, or changing the flour blend without adjusting hydration.
What to do: Weigh your flour instead of packing it into measuring cups. Keep the dough softer than ordinary wheat bread dough.
Don’t add handfuls of flour to eliminate stickiness.
Also confirm that you used the correct type and amount of psyllium.
Bread Did Not Rise
Likely causes: inactive yeast, water that was too hot, a very cold proofing environment, insufficient proofing time, or dough that was too dry to expand properly.
What to do: Start with reliable yeast and comfortably warm water.
Move the loaf to a warmer location and use visual cues to judge fermentation.
If the dough barely changes in volume after sufficient proofing, check the yeast before assuming the flour is the problem.
Bread Rose and Then Collapsed
Likely causes: over-proofing, excessive liquid, insufficient structure, or a center that did not bake long enough to support the loaf.
What to do: Bake the next loaf sooner, before it becomes excessively inflated.
Confirm your water and psyllium measurements, and make sure the middle of the loaf is fully baked before removing it from the oven.
Bread Has Large Holes
Likely causes: uneven mixing, over-proofing, or large air pockets trapped when you transfer the dough to the pan.
What to do: Mix thoroughly and spread the dough evenly in the pan.
When smoothing the top, avoid aggressively compressing the dough, but make sure there are no large empty pockets.
Do not allow the loaf to become excessively puffed during proofing.
Crust Is Too Hard
Likely causes: too long a bake time, an oven running hotter than expected, or leaving the loaf exposed to high heat for too long.
What to do: Check your bread earlier and tent the top loosely with foil if it is browning too quickly.
If you bake regularly, an oven thermometer can also help you see how closely your oven matches its temperature setting.
Gluten Free Flour Substitutions
Gluten-free flours are not interchangeable in the same way many wheat flours are.
Replacing the main flour in a bread recipe can change:
- hydration;
- flavor;
- crumb;
- structure;
- browning;
- rise.
For that reason, avoid assuming that any gluten-free flour can replace another flour 1:1.
Almond Flour
Almond flour contains more fat and behaves very differently from rice flour or starch.
Replacing a large amount of the flour blend with almond flour can substantially change the structure of a yeast loaf.
Coconut Flour
Coconut flour is exceptionally absorbent.
Even small changes can dramatically alter hydration, so don’t treat it as a direct replacement for rice flour.
Oat Flour
Oat flour can add a soft texture and mild flavor, but it absorbs and structures dough differently from rice flour.
If you need strict gluten-free ingredients, choose appropriately labeled gluten-free oats or oat flour.
Rice Flour
Rice flour is widely used in gluten-free bread recipes because it provides useful body without gluten.
Brown rice and white rice flour do not produce completely identical results, however, and grind size can also affect texture.
Buckwheat Flour
Despite its name, buckwheat is not wheat.
It has a distinctive flavor and can contribute body to gluten-free blends, but replacing a major portion of the flour will change the taste, color, and hydration of the bread.
Chickpea Flour
Chickpea flour contributes protein and has a noticeable legume flavor.
It can work in some bread blends but is not a neutral 1:1 replacement for the brown rice flour in this recipe.
The safest approach is to use the stated flour mixture for your first loaf. Once you understand the correct dough consistency, experimenting with substitutions becomes much easier.
Can I Make Gluten-Free Bread Without Psyllium Husk?
Yes, you can make gluten-free bread without psyllium husk, but don’t simply remove it from this recipe without replacing its structural role.
Other gluten-free recipes may use:
- xanthan gum;
- ground flaxseed;
- chia seeds;
- combinations of different binders.
These ingredients behave differently.
Flax and chia absorb water but do not produce the same structure as psyllium. Xanthan gum is used in much smaller quantities and should not be substituted for psyllium 1:1.
Changing the binder may require adjusting both the liquid and flour balance.
If you specifically want psyllium-free bread, using a recipe formulated around a different binder is usually more reliable than removing psyllium from a recipe designed to use it.
Best Ways to Serve Gluten-Free Bread
Once the loaf is completely cool, you can use it much like other sandwich bread.
Try it for:
- avocado toast with tomatoes and black pepper;
- vegan sandwiches;
- toast with peanut, almond, or seed butter;
- toast alongside vegetable soup;
- hummus toast with cucumber and herbs;
- vegan breakfast toast with fruit;
- bruschetta-style tomato and basil toppings.
Toasting is also a useful way to refresh slices after storage or freezing.
How to Store Gluten Free Bread
First, allow the loaf to cool completely.
Wrapping warm bread traps excess steam and can make the crust and crumb overly moist.
Once cool, keep the bread well wrapped or in an airtight container to limit moisture loss.
For longer storage, freezing is especially practical.
Freezing Gluten-Free Bread
Slice the loaf before freezing so you do not need to thaw the whole bread every time you want one or two pieces.
Separate the slices as needed and place them in a freezer-safe airtight container or bag.
You can then thaw or toast individual slices as needed.
This is usually more convenient than freezing an unsliced loaf, especially if you mainly use the bread for breakfast or sandwiches.
Frequently Asked Questions
Is gluten-free bread vegan?
Not necessarily. Gluten-free and vegan describe two different things.
A gluten-free bread can still contain eggs, dairy milk, butter, whey, honey, or other animal-derived ingredients.
This Mealloom recipe is both gluten-free and fully vegan.
Why is gluten-free bread so dense?
Gluten-free bread can become dense when it doesn’t rise enough, has too little moisture, uses inactive yeast, or lacks enough structure to hold the gas produced during proofing.
Accurate measurements, sufficient hydration, active yeast, and proper proofing all matter.
Does gluten-free bread need yeast?
No. Not every gluten-free bread requires yeast.
Some recipes use baking powder, baking soda, sourdough fermentation, or other leavening methods.
This recipe uses yeast because the goal is a traditional loaf-style gluten-free bread with a fermented bread flavor and rise.
Can I make gluten-free bread without yeast?
Yes, but it becomes a different type of bread.
Yeast-free gluten-free breads usually rely on chemical leavening such as baking powder or baking soda and require different ingredient ratios.
Do not simply remove the yeast from this recipe and expect the same result.
Why is my gluten-free bread gummy?
The most common reasons are underbaking, slicing too early, excessive moisture, or inaccurate ingredient measurements.
Make sure the center is fully baked, and let the loaf cool completely before cutting.
Why does gluten-free bread fall apart?
A loaf can crumble when it is too dry, lacks enough binder, contains an unsuitable flour balance, or is sliced before its structure has fully set.
Accurate hydration and the correct quantity of psyllium are particularly important.
Does gluten-free bread dough need to be kneaded?
No. Traditional kneading is unnecessary for this type of gluten-free bread.
No gluten network needs to develop.
Thorough mixing is still necessary to hydrate and evenly distribute the ingredients.
How do I know when gluten-free bread is done?
The loaf should be well browned, firm along the sides, and completely set through the center.
If you use an instant-read thermometer, a center temperature around 205 to 210°F (96 to 99°C) can provide another useful indication.
Always cool the loaf completely before judging the final crumb.
Can gluten-free bread be frozen?
Yes. Freezing individual slices is a convenient way to store homemade gluten-free bread.
Cool the bread first, slice it, package the slices airtight, and thaw or toast them as needed.
What is the best flour for gluten-free bread?
No single gluten-free flour is best for every loaf. A balanced blend of flour and starch is usually more useful than relying on a single ingredient.
This recipe combines brown rice flour, tapioca starch, and potato starch because each component performs a different role.
Changing the blend can change both hydration and structure.
Conclusion
Good homemade gluten-free bread becomes much less mysterious once you stop expecting the dough to behave like wheat bread.
Keep the dough properly hydrated, look for a controlled rise rather than waiting unthinkingly for it to double, bake the loaf completely, and let it cool enough before slicing.
Most importantly, pay attention to the dough itself. Once you recognize the correct soft, sticky consistency, you will be in a much better position to make consistent gluten-free yeast bread and troubleshoot future loaves.